 |
| Squat / Bench Stand with DIY Spotter Catchers - With Stain |
Equipment that I use
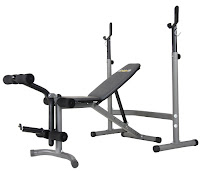
I own the Body Champ Olympic Weight Bench with Leg Developer. It's an okay set for the price. The decline only goes down 10%, so I used a 7/16" cobalt drill bit and made a hole lower to get the back down to aprox 25/30% for decline bench press. The lowest position of the bar was just above my extended arm length, so I used the same drill bit to drill a couple of holes so I can lower it more (also had to move the drill in a circular motion to widen the holes as 7/16" for the screw in pins was too small). The bench is just a tad to high for my liking, so I built a stand (as can be seen in the picture above) so I could feel more connected to the "ground" when benching.
The Plan
I googled for DIY squat racks and stumbled on Garage Gym Guy's blog. He built some Squat Stands with DIY Spotter Bars. So I took that idea and mocked up a plan on my tablet. I wanted it a bit more sturdy. So I used metal brackets where I could, lag bolts, and carriage screws. Overall, probably around $50, but I didn't buy anything on sale and I had some of the wood and bolts from other work around the house. See the materials used at the end of this post.

A note when building,.. the rear uprights will need to have a cut made to fit over the bottom legs of the squat stand. In my case, they are round. So I used a 2" bore bit to drill a round hole and then cut the bottom of the legs off (I made the rear uprights longer as I took this into consideration when building). There is also a bolt that sticks up. So I drilled into the bottom of the upright leg so it would fit over the bolt. My advice, with whatever squat stand you have, is to work just spend some time thinking and working around any issues as they come up.
I also sanded all sharp corners and the top of the uprights. Predrill all holes for lag bolts so you do not split the wood.
Spotter Bars
To figure out how high your spotter bars should be, clamp on some 2x4's to the front and rear uprights, have the bench horizontal, and bring the olympic bar down to your chest on the 2x4's (and relax!). That should be the top of your bar. I also use this height as my squat catcher. When you bench, you typically arch your back and stick your chest out. If you fail a set, lower to chest, relax, and squirm out!
After you have figured out the height and have your 2x4's where they need to be, use a level to check perpendicular, parallel, and diagonal on the 2x4's. Then use a square to mark where the top of your bars should be.. this all took me a couple of hours to figure out as I did it for decline as well.
Max Weight
I am just starting to lift again (after 18 years). So I am not squatting or benching a lot, less than 300 on the bar. My stands have a max of 300 lbs on the bar. To test the catchers, I loaded up the bar with 150 lbs and slammed it down a few times on the pipes. Other than marring my new pipe, it didn't do anything to the bars and nothing moved or slipped. But I didn't expect it to as I overbuilt.
 |
| Squat / Bench Stand with DIY Spotter Catchers Without Stain, sanding, and extra diagonal supports |
Materials used:
- Quart of Black Stain with Polyurethane
- 2x 1" pipe clamps so the spotter bars do not move/slide back out
- 2x 48" 3/4" galvanized pipe for drinking water (you can get them in 4 foot pieces)
- 1x 1.125" spade bore bit for making the holes (1" is too tight). 0.125 = 1/8"
- Long 3/8" drill bit for the carriage bolts.
- 6x 2"x4"x6's
- 4x 2"x6"x8's (I would have purchased two 2x6x10's instead for the base, didn't feel like driving to the back of Menards and trying to load them in the minivan)
- Around 18 Lag bolts
- 4x Carriage Bolts (8" x 3/8" diameter) - I cut the ends off as they stuck out. They didn't have any 7" bolts.
- 3/8" standard washers
- 3/8" lock washers
- 3/8" nuts (probably could have gone with lock nuts)
- 4x Square U Bolts (3/8" x 4" x 7". They didn't have any 3 1/2" bolts, so I tilted the bolts at an angle and cranked them down)
- 2x Heavy duty L brackets for the front posts
- 6x 2x4 L brackets for front posts and back post (probably didn't need them on the back)
- Standard construction screws to help hol dstuff together while you build it.
- Wood glue for the upright posts
